|
Raise Purchase Order
|   |
|
Raise Purchase Order
| |
From the main menu select Purchase Orders. You will be presented with a screen similar to the following:

The purchasing module allows us to place orders on suppliers for just about anything from a service to a car, drill bits or material for a job. There are several ways to approach creating a new order. We could simply select the new order button, enter the job no we want to order for, select a material, subcontract or tool item and then system will work out what quantity we need.
Here though we are going to approach it a slightly different way. Lets say we have entered several jobs, each with different materials. Rather than make a note of what needs ordering at the job activation stage, we can take the hard work out of this.
Select the material requirements menu option, this time from the top menu.
![]()
A window will appear showing all items we need to order to fulfil our current order book. The items shown are grouped by supplier and stock id order.
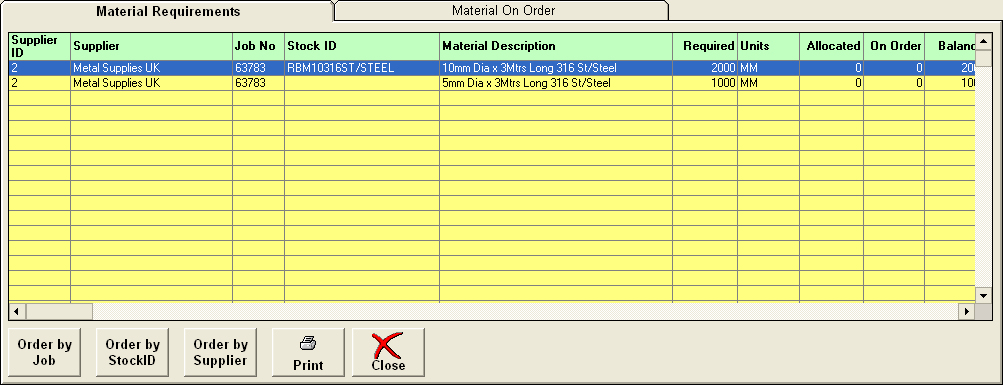
At the bottom of the windows are several buttons which allow us to place orders in various ways.
Order by Job will create a purchase order for the currently selected item. We can tell which item this will be as the selected row will be highlighted. To select a different item, simply click on the required line to highlight it.
Order by Stock ID allows you to create a purchase order for a selected stock id. You will notice that the all the stock id’s that are the same, are grouped together within a supplier. Selecting any one of these will simply add the total requirement together and add it to a purchase order as a single item.
The final option, Order by Supplier will create a purchase order to the selected supplier and create a single item for each different stock id shown within that supplier.
You will also notice that there is a second tab at the top of this window shown as ‘material on order’. This will show all purchase items currently on order from suppliers.
In the material requirements tab and with our tutorial job selected (look for the RBM10 stock id), click on the ![]() button.
button.
A message box will appear asking whether we want to create a new order.

If we say yes to this, then a new purchase order will be created. Selecting no will add an item to the currently displayed order. Cancel will end the current request. Select Yes.
You will notice that all the purchase order has been filled in for us. The system knows how much material is required and where to get it from. The only thing left for us to do is enter a delivery date. Select the date required field and enter a date sometime into the future.
At this point you may also want to increase the order quantity for example to have some extra in stock as it is a common size material used all the time or the quantity returned by the system is not possible for example 2.5 metres bar as your supplier will only deal in 3 metre lengths. There is an automatic option within the stock control system which allows us to ‘round up’ certain type of material so that in the example the order would become 3 metres instead of 2.5 metres.
At this point you can also change the supplier and most of the fields on the screen. We may for example require a material certificate with this, so we could select the cert required box. Item notes might also be useful to tell the supplier specific special instructions. Not forgetting the price.
Located on the bottom right of the screen there is a small information box which shows us certain important information such as material already on order and more importantly if there is any spare (free order) for this job. This prevents us from over ordering material.

Select the save button and a new order is generated.
You will notice that the job no we used has been transferred to a small table on the bottom right hand side of the screen. Here we can add additional jobs in order of priority starting at the top. When part deliveries are received material is allocated in order of jobs listed here.

The final option will be to send the order to any one of three destinations, printer, fax or email. Select the ![]() on the bottom menu followed by the Preview button. A copy of the order will appear in the window with the three options available to us on the menu at the bottom. Select
on the bottom menu followed by the Preview button. A copy of the order will appear in the window with the three options available to us on the menu at the bottom. Select ![]() to return back to the purchase menu.
to return back to the purchase menu.
The next step in our tutorial is to receive the goods and book them in.
Next - Goods In