|
Create Quotation
|   |
|
Create Quotation
| |
From the main menu select Quotations. The last quote entered will be shown as the example below.
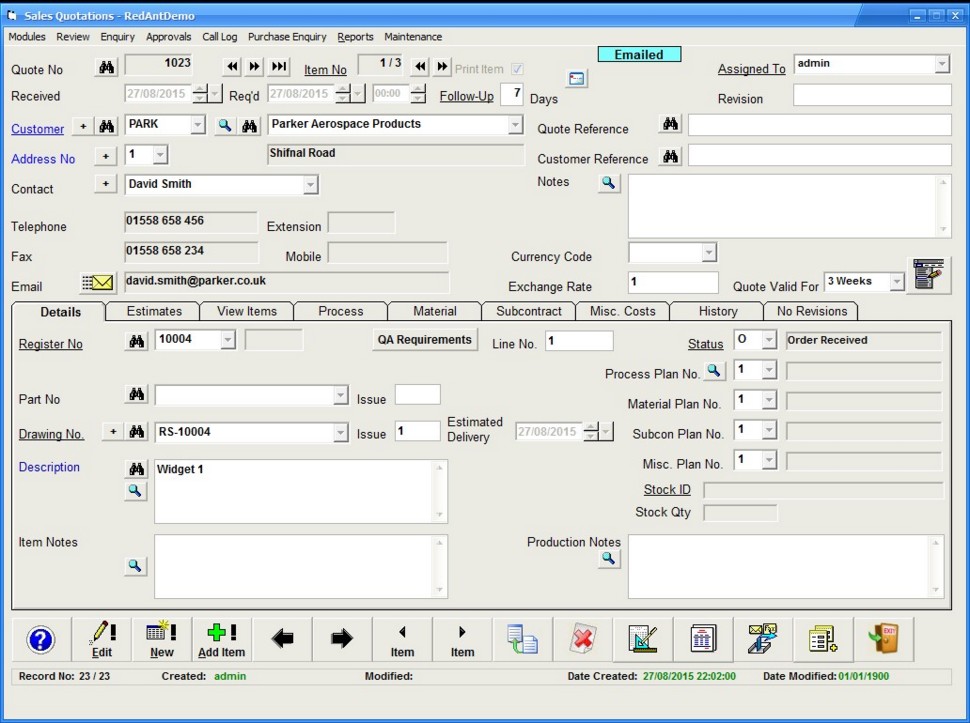
To add a quote, select New from the menu bar at the bottom of the screen. The screen will clear and the cursor will be visible in the drawing no. field. You will notice that some of these fields have arrow heads located at the end. These are what we call combo fields. As we start typing into these fields, the system will attempt to locate the item based on what you enter.
Enter the letter A into the drawing number field. You will notice a dropdown box appear and the first drawing starting with the letter A will be highlighted.

The more we type the closer the match. If after typing several letters the correct item is highlighted, then pressing the enter key will fill in the rest for you. On the other hand if nothing is highlighted then we know we have never used this drawing number before and we must continue to type the full detail followed by the enter or tab key to move to the next field.
The minimum data entry requirement on any screen is shown as a BLUE field description e.g. on the quotes screen our minimum is a description, customer and an address as these are the only blue fields. Everything else can be left blank to be entered or changed later.
You will also notice while adding a new quote most of the menu options are disabled.

Only two active items are the SAVE and CANCEL buttons. These are fairly self explanatory, the SAVE button will store our new quote details and the system will then issue us with a new unique quote number. The CANCEL button however will remove anything we have done and then display the last quote on the system.
If we had selected a drawing from the list then the majority of the remaining fields will be filled in for us. Alternatively we may have selected a drawing from the list because the drawing number is correct but we can now change the issue no to something different. The system will be fully aware of this change and confirmation to create a new drawing when the quote is finally saved will be required.
RedAnt also has a facility to automatically create drawing numbers for you should you wish to do so. This facility can be switched on from within the defaults settings of the system.
For this tutorial enter the drawing number ABC followed by the enter or tab key. RedAnt will recognise either key press to move to the next field. There is one exception to this rule which we will discover later.
In the issue field enter 1 followed by enter. The cursor now appears in the description box. Here we can enter as much description as you want – there is no limit. Type ‘Drive Shaft’ as the description. If you now press the enter key, look what happens! Instead of the cursor moving to the next field it has simply started a new line within the description. This is the only time the enter key will not move to the next field, where we have a multi-line entry field. We can tell these apart from other fields due to the ‘slider bars’ on the right hand side. We can use these to quickly move up and down large amounts of text. In this case we HAVE to use the TAB key to move to the next field which is the notes field.
The item notes field is again a multi-line text box. Here we can type any specific notes appertaining to the item we are quoting for. These notes can be included in the document sent to the customer if so desired. We may type here special instructions or details for the drawing in question. Use the TAB key to move to the next field.
The next four fields allow us to quote or make the item in an unlimited number of ways. This option goes beyond the quotes tutorial and is discussed elsewhere in the help system. Press the enter key several times until the cursor appears in the production notes field.
Here we can enter any specific instructions which would relate to the manufacture of the item. These notes are transferred onto the job card should the customer place an order with us.
Let us now use the mouse an click into the Date field at the top of the quote screen. You will notice that this has defaulted to today’s date and unless you want to specifically change this, press the enter key to move to the Customer field.
Now enter the letters PEL. The system will now locate the customer from the list.

You will notice that PEL appears twice. This is because it has two addresses available. Select the first one by pressing the enter key.
The cursor now appears in the address no field. This time select the arrow head to the right of the field. This will show both addresses available for this customer.

Select the second address by left clicking the mouse on it. This is another method of selecting from a drop down field although you would not want to use this method for drawing numbers or say job numbers as there could be literally thousands to scroll through to get the one you wanted. Press enter to move to the contact field.
By typing JOHN into the customer contact field, the system will try and locate John’s details stored against the customer. As John doesn’t exist in the list you have two choices. Either leave the name as it is and move to the next field OR click the ![]() button to the left of contact. This will allow you to fill in all the details for the contact including phone no, fax, email etc. This information is used for sending documentation to the customer. Failure to add a new contact will result in you having to type a fax number or email address every time.
button to the left of contact. This will allow you to fill in all the details for the contact including phone no, fax, email etc. This information is used for sending documentation to the customer. Failure to add a new contact will result in you having to type a fax number or email address every time.
Hit the ![]() button now and a blank customer contact screen will appear. Type contact name as JOHN, a fax number and email address.
button now and a blank customer contact screen will appear. Type contact name as JOHN, a fax number and email address.
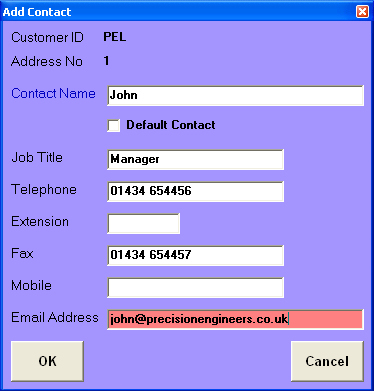
When you have completed all the details select the OK button. You will now be returned to the contact field. If you now type JOHN, you will see his name appear in the list. Press the enter key to select.
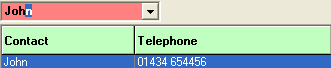
You will now notice all the details appear below the name. This is useful here for anybody chasing up a quote.
You will now have moved to the Enquiry Reference field. Enter here any reference code the customer may supply. This will allow you to tie up your quote number with their reference. Press enter to move to the next field.
Anything entered into Quotation notes can be printed on the quotation document sent to the customer.
Two other fields which I will mention briefly are Currency Code and Exchange Rate. RedAnt will allow you to create your quote in your own currency but output the finished document in the customer’s currency at the exchange rate quoted. This is beyond the scope of this tutorial and is discussed elsewhere in the system.
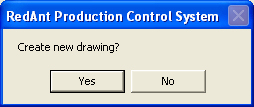
We have now completed enough details to enable us to save the quote. Press the ![]() button on the bottom of your screen. A question will appear asking you to confirm this is a new drawing. This is a safety check in case we had selected the wrong one.
button on the bottom of your screen. A question will appear asking you to confirm this is a new drawing. This is a safety check in case we had selected the wrong one.
Click the ![]() button. A new quote number will appear at the top of the screen and as this is the first item on this quote item 1/1 will appear in the item field. The first part of this is the item we are currently looking at and the second part after the / is the total number of the current quote.
button. A new quote number will appear at the top of the screen and as this is the first item on this quote item 1/1 will appear in the item field. The first part of this is the item we are currently looking at and the second part after the / is the total number of the current quote.
At this point we will point out some of the buttons available to us to move around the quotes system. These are standard throughout RedAnt so making it easy to learn.
The ![]() button allows us to search for information based on a specific field e.g. a customer comes on the phone and wants to talk about a specific quote. All they have to hand is their Reference Number. By simply clicking the
button allows us to search for information based on a specific field e.g. a customer comes on the phone and wants to talk about a specific quote. All they have to hand is their Reference Number. By simply clicking the ![]() button adjacent to Enquiry Reference a search window will appear. As you type the reference in the system tries to locate the quote for you. When the item in the list is highlighted then click the Select button and the quote is displayed..
button adjacent to Enquiry Reference a search window will appear. As you type the reference in the system tries to locate the quote for you. When the item in the list is highlighted then click the Select button and the quote is displayed..
The ![]()
![]() menu buttons move you backwards and forwards through each quote one at a time. Likewise the
menu buttons move you backwards and forwards through each quote one at a time. Likewise the ![]()
![]() buttons move through each item of a quote. These menu buttons are duplicated at the top of the screen next to quote number and item number as video buttons with the addition of a Last Quote button.
buttons move through each item of a quote. These menu buttons are duplicated at the top of the screen next to quote number and item number as video buttons with the addition of a Last Quote button. ![]()
![]() . The
. The ![]() button will always take you to the last quote on the system.
button will always take you to the last quote on the system.
Tech Tip – if there a large number of items on a quote, select the View Items tab (middle of the screen), ![]()
move to an item in the list using the scroll bars making sure the item to be viewed is highlighted and then click the View Item button. This will take you immediately to it.

Now we have the item details on the screen the next step is to cost it up. If this is not required we can proceed to the estimate tab, enter a quantity and price then send the document to the customer. (See Estimate Tab below to skip these sections and produce a quick quote). To get the system to suggest an item price then it requires certain details to do so.
You will see a series of Tabs across the middle of the screen. This is where we are going to be doing the remainder of the costing. The details tab will always take us back to the drawing details.
Next - Process Tab