|
Process Tab
|   |
|
Process Tab
| |
In this section we will show how the job is going to be produced, how long it will take and the rate per hour we are going to charge the customer.
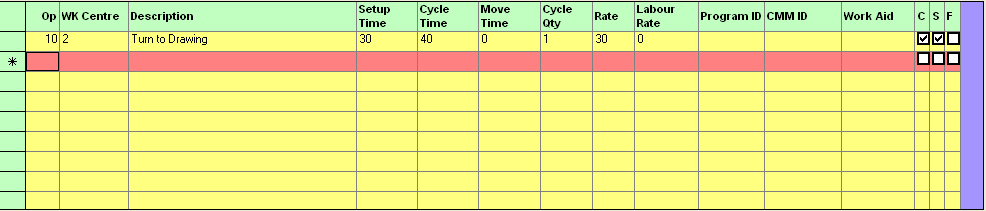
Click into the Op field on the first empty row. We usually number the sequence of operations in multiples of 10 to allow the insertion of additional ones at a later date. Enter 10 followed by the enter key.
The cursor will now appear in the WK Centre field. Work Centres are areas of manufacture and can be anything from a machine, human resource, inspection department or even type of subcontract. The WK Centre is a major factor when the quote turns into a job and we are able to look at the workloads of different areas of manufacture and schedule this accordingly. For the tutorial type a number 2 into the field. This is a dropdown field and it will now highlight Work Centre 2 in the list. Press enter to select it.

When we initially setup this work centre in the maintenance section we included a basic description. This keeps typing to a minimum especially when creating a quote where you may not even get the order and long descriptions are not necessary at this point. We can accept the default description, change or retype it completely. The description field is unlimited in its size.
The setup time is the time it will take to setup this particular work centre before it can start producing. Time is expressed in whole minutes. Enter 30 followed by enter.
Cycle time is the time in minutes required to do 1 item. Enter 40 followed by enter.
Move time is the time it takes to move from this operation to the next. It may apply if operation 10 is say painting and we need to allow a time for it to dry before going to the next op. Leave this as 0 and press enter.
The cycle quantity will default to 1. Sometimes when producing large quantities in small amounts of time it may be easier to express this here. For example if this operation is producing a thousand items per hour then rather than try and work out a cycle time for each item, we could enter a cycle quantity of 1000 and a cycle time of 60 i.e. we can produce 1000 items in an hour. Leave this as 1 for our example.
The rate field has defaulted to the normal charge out rate for the work centre we just selected (this default rate is setup in the work centre maintenance section on the main menu). If we feel we could perhaps get more per hour or the price quoted needed to be trimmed to get the order we can change the standard rate here which will have an immediate effect on the suggested estimated price calculated by the system (see later). Press enter to move to the next field.
For customers who wish to split their charge out rates separate from labour we can enter the labour rate separately here.
Program ID is used for storing a program no from say a CNC machine tool.
CMM (co-ordinate measuring machine) is used to store a program reference.
Work aid is used to hold a reference to a fixture.
The last three fields are what we call ‘tick boxes’ or switches. If the box is checked then it is on and unchecked off.
The C checkbox if selected will print the cycle time for this operation on a production sheet or job card.
Likewise the S checkbox will print the Setup time.
The F checkbox allows us to force this operation to use the work centre selected and not try and schedule it to be made on a similar work centre.
The spacebar or a mouse click can be used to turn these on or off
Press the enter key until it appears on a new line below operation 10. You have now successfully entered your first operation.
Practice adding a few more operations starting with 20 as the next operation number.
Next - Material Tab