The Job Order module can be started from the Main Menu > Job Orders button.
The last Job No. entered will always be shown when first opening the module.

Field Definitions
Works No
This is an auto generated number for one or more items called jobs. These items (jobs) are individual parts or drawings which can belong to the same works no. Using the works no. enables us to quickly view the status of all items (jobs) with the same works no. whether they are internal or from a customer's order. The works no. can be deemed to be the same as a customer's order no. which may have several items (jobs). However, a works no. can be an internal order used to manufacture items (jobs) for stock or group assembly items together.
Job No
The Job No. is an auto generated number given to an individual part or drawing e.g. an item on a customer's order. However, if the item was an assembly then the item could be exploded in many other parts each with their own job no. In this case each job would be associated with the same works no. (see above). Each Job can be deemed the same as an item on a customer's order or an item being made internally for stock or other requirements.
Customer
the customer's ID. (see customer module for more details)
Order / Delivery /Invoice Address No.
The address no.'s you received the order from, the address the items are being delivered to and the address where the invoice will be sent. Use the + button to add a new address if not available from the list. See Customer module to preset these addresses for the customer.
Assigned To
The user you wish to assign the job to. The default will be yourself. If this is changed to another user then they will be notified via an email.
Department
The department you want the job assigned to. To setup departments follow this link. You can preset the department for a customer in the customers module. Departments can be used for report analysis purposes and can be exported to accounts.
Order Notes
Enter any specific notes that appertain to the works no. If you want to add notes for the job no. then click the Job No. link.
Process / Material / Subcon / Misc / Cutting Plan No's
Order Qty
Enter the customer's order quantity. Enter a 0 if this is an internal order.
Job Qty
Enter the quantity you want to make. This may however change depending if stock is used (see later). The Job Qty cannot be less than the order qty
Price Per Unit
The price each you are going to charge the customer
Custom 1 / 2
These two additional custom fields may not be displayed on your system however, they can e turned on and you can use them for whatever additional data you require. Custom 1 can be searched and both can have preset options to choose from. See here to setup and here to create preset items.
Customer Order No.
The order number received from the customer
Line No.
The line number from the customers order
Market Type
See the following topic
Nominal
see the following topic
Delivery Required By
this is the date the customer requires delivery of the item
Stock ID
this is the ID for the item's stock record which can be used to maintain stock levels and to store additional quantities over and above the order quantity. See the following topic on how to auto generate and ID
Production Notes
you can enter any information here that you may want printed on the route/job card
Create a New Works Order / Job
The system can operate in one of two modes. It can be set so that the works no is always the same as the job no. i.e. they both keep in sync with each other which some users prefer it this way. However, if you have items which are assemblies of other parts then it cannot operate in this was and it has to be set so that the works no. and job no. have separate numbering sequences. Please discuss this with technical support or your trainer as to which mode you would like the system set to. By default it is the latter.
You should have by now setup the numbering sequences for all the Redant modules - if not go to this link before adding your first entry
Select the New button from the bottom menu. You now have a choice to make.
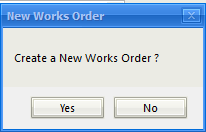
Selecting 'Yes' will create a new works order i.e. the works no. will be incremented by one and a new job will be created under that works no. Selecting 'No' will leave the works no. as shown, including a lot of the previous details e.g. customer, order no and delivery required date etc. A new job will be added with the same works no.
When entering a customer's order for instance then you would select 'Yes' for the first item followed by no for each of the other items on the order. This way all the customer's ordered items would be under the same works no with a unique job no. for each. You could also go back to an existing works no. at any time and add a new job to it if necessary.
When creating any new record in Redant, the minimum data entry requirement would be any field name shown in 'blue'.
You are first prompted to enter a 'Drawing No'. As you start to enter data the system will search its database to see if we have the item in the drawing register. As you type if the correct item is shown then pressing the Tab' or 'Enter' key on your keyboard will select that item. If however no match is found, continue typing to insert the full drawing no. as required. You may use the Register No. or Part No. fields in the same way however, neither of these 3 fields are blue so no data input is necessary.
I you do enter a drawing no you will however be required to enter an 'Issue' If this is not available then enter a '-' or N/A
The Description field is mandatory and input is required. You can enter as much data as you require but please bear in mind this will be printed on delivery notes, invoices etc.
Enter the Customer's Order Qty or this can be set to 0 if it is an internal order. The Job Qty will be the quantity you wish to make however, the actual quantity will depend on whether stock is used as part of the manufacturing process.
The next important fields are the Customer Order No. and Delivery Required By fields. If you do not have an order no. then enter TBA. If no delivery date is required then be sensible as to when you can achieve this as other modules in the system rely heavily on this date i.e. Capacity Planning and the Finite Scheduler.
Production Notes can contain any information you may want the shop floor to be aware of during manufacture.
Moving to the top of the form, enter the Customer ID or alternatively you can enter the customer name. The system will search as you type and once the correct item is shown, the Tab or Enter key will select it.
The Address No's will default to 1 unless the customer record has been setup differently. The + button allows you to add additional addresses for this customer if required.
Select Save to create the new Works No. and Job No.for the Item. You can select the Cancel button but all data will be lost.
Now you have the first item of the order entered you can select New followed by No to create the next job under the same works no. If the next item is for a different customer then select Yes to create a new work no.
Every new Job created will have a status of 'Entered'. At this status point the job will need to go through several procedures until it can move to the next stage. The other status' will be discussed later.
At the entered stage there may be several requirements that the user must fulfill before moving to the next stage. These requirements will depend on switches that have been set when the system was first installed, namely Contract Review, Order Acknowledgment and Proforma Account.
Contract Review
If a contract review is required then it will be shown in red above the register no. This will be a series of items which will require completing by one or more users. See the example below. The requirements are preset by yourself and will be applied to every job. See the following link on how to set these up.
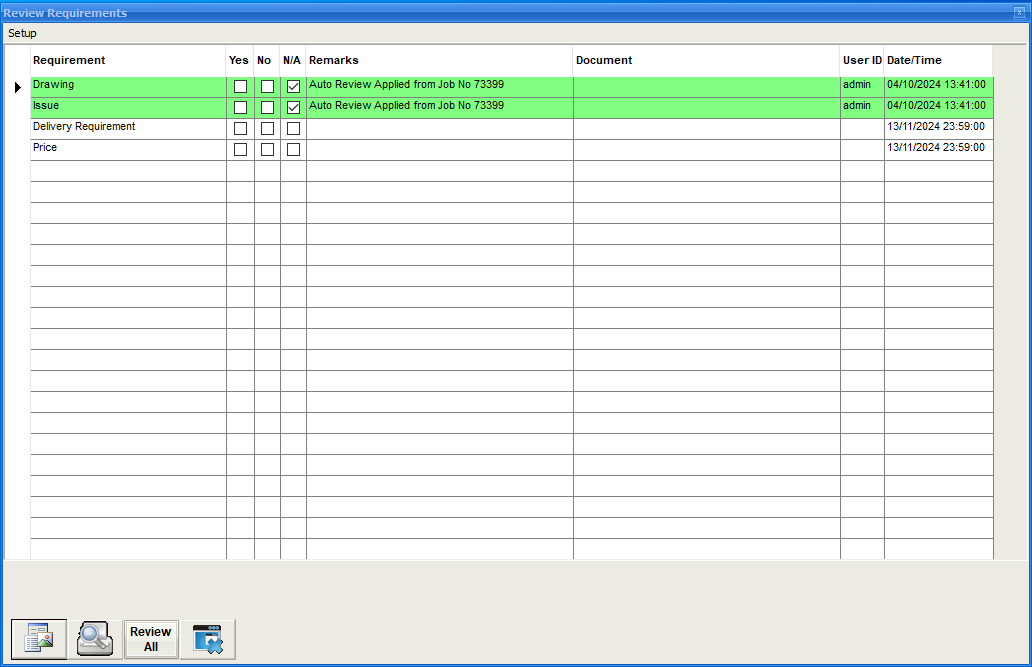
Each entry must have a check in either Yes,No or N/a before the contract review is deemed complete. As you select any of the 3 options for each of the requirements, your user name and the data/time is added to the grid. You are not able to remove entries by other users and they are not allowed to remove your entries. This makes it secure ans acceptable for any quality standard you may have.
Order Acknowledgement
If the Acknowledgement Required' option is set in the customers record then you will be required to send one before moving the job to the next status level. If the Field name 'Customer Order No.' is shown in red then this is a requirement that has not been completed. Green shows that it has been sent. To send an acknowledgement then select Reports form the top menu.
You may require the contract review to be completed before being able to send the acknowledgement. This however can be reversed by a switch if required.
Proforma Account
If the Works No is shown in red then this customer is on a proforma account. In other words, and invoice is submitted prior to manufacture and payment terms agreed. This setting is the default for all new customers but can be turned off in the customer module.
To print a proforma invoice select Reports from the top menu. Proforma terms and conditions can be entered by select the 'Price Per Unit' field name which is show as underscored (quick link)
Planning Tabs
See the following under Quotations. Process, Material, Subcontract and Miscellaneous
Activate Job
It is important that you have completed the Process Plan before moving the job to the Active status. We would suggest that this is one of the items in your contract review. When a job is made Active, a copy of the process plan is used by the capacity planning and the finite scheduler modules as well as the shop floor systems. Failing to create a process manufacture plan without operations and estimated times will render the system useless if these modules are being used.
To Activate a job select Activate Job from the top menu. The following window will be shown listing all the jobs at the 'Entered' status
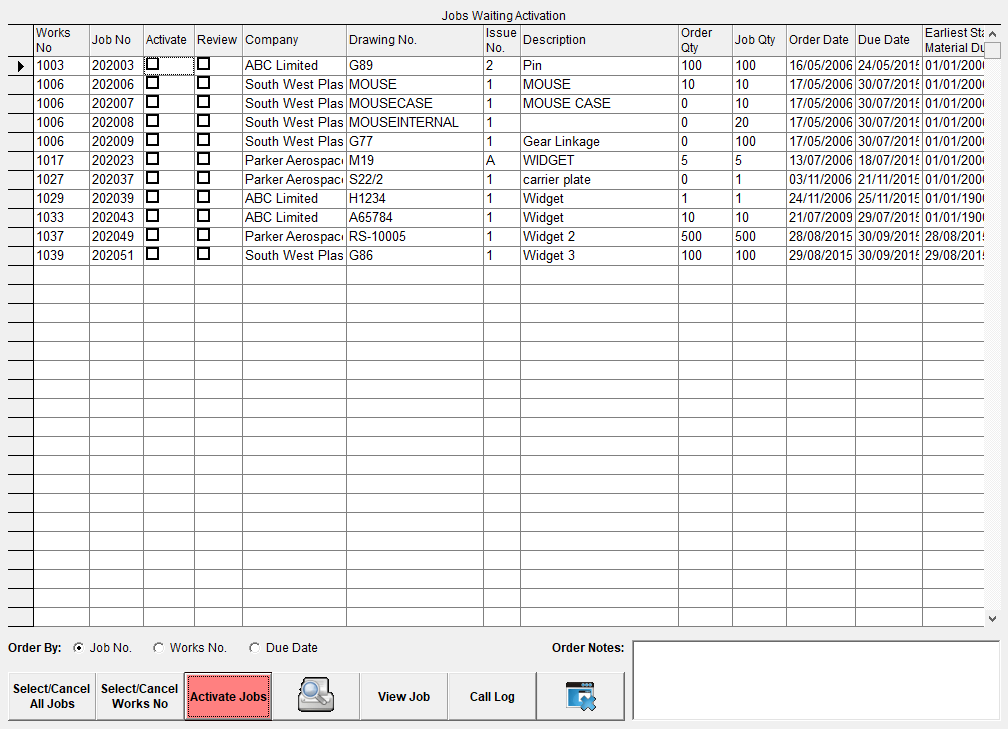
Select the job you want by clicking the 'Activate' column. You can select more than one or use the button Select/Cancel All Jobs. Select the Red Activate Jobs button. You will then be returned to your previous window where the job will now show a status of 'Active'
Delivery Schedule
Material Status
Route / Job Card
Information
Stock and Stock Used Tab