We now have our order displayed on screen with a status of ‘Entered’ (shown at middle top of screen ![]() ). Any one job will go through several different statuses,
). Any one job will go through several different statuses,
•![]() ‘Entered’ (new order but nothing been done to it),
‘Entered’ (new order but nothing been done to it),
•![]() ‘Active’ (ready for manufacture),
‘Active’ (ready for manufacture),
•![]() ‘Printed’ (job card/works order printed),
‘Printed’ (job card/works order printed),
•![]() ‘Complete’ (job complete),
‘Complete’ (job complete),
•![]() ‘Invalid’ (cancelled job).
‘Invalid’ (cancelled job).
This enables us to quickly identify where it is in the manufacture cycle due to the different colours given to each type.
You will now be familiar with several of the tabs shown on the screen, Process Plan, Material Plan etc. These are identical in functionality as in the quotes and drawing screens. Using your mouse select the process tab to have a closer look. Information we entered at the quote stage is now visible at the job stage. We can at this point make any additional changes before we commit this job for manufacture.
Some additional tabs which you may not have seen before are;
•Due Date (allows us to split a job up into multiple delivery dates and quantities),
•Stock Used (allows us to allocate quantities from stock if available rather than manufacture the full quantity)
•Stock (used to view if we have any stock from previous jobs where we may have had over-runs or extras made)
Once we are happy with our order details we can proceed to make the job ‘active’. For larger companies there is an option of using the contract review option built into RedAnt. This allows us to setup a series of checks or procedures that a job must go through before it can become live. These maybe, ‘check drawing no’, ‘check issue no’, ‘check price’, ‘can we meet delivery date’ etc. You may have up to 8 procedures which you, the user set. You are able to create and change these procedures by selecting Contract Review Procedures from the Maintanance menu on the Main menu screen. Unless each of these procedures has been authorised then the job will not be allowed to go ‘active’. In our tutorial this option has been switched off.
Select ‘Activate Job’ from the top menu.
![]()
You will now be presented with a list of all jobs that need activating, in other words ‘make live’.
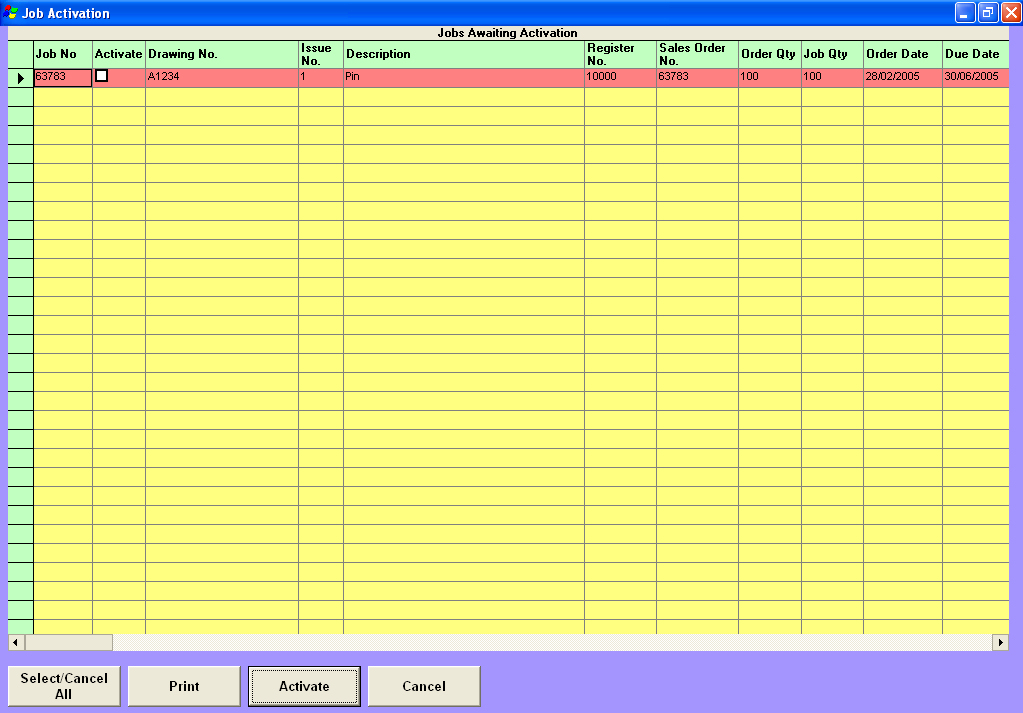
Our newly entered job will be shown in the list with a tick in the ‘Activate’ box. This is so we can quickly locate it and make it active quickly.
At the bottom of the screen select the ![]() button. You will now be returned to the job screen and the job status will have changed to ‘Active’.
button. You will now be returned to the job screen and the job status will have changed to ‘Active’.
This action does several things within the system. Its main function is to look at the work required to produce the job and schedule this workload into the system’s scheduling and planning module. It also calculates material requirements and places demands on the system so it is aware if it is available from stock or whether it needs to be ordered. We will see this later when we tackle the purchase orders module.
Our next step would be to produce a job card or works order. From the bottom menu select the ![]() . You are presented with 2 fields so a range can be entered.
. You are presented with 2 fields so a range can be entered.
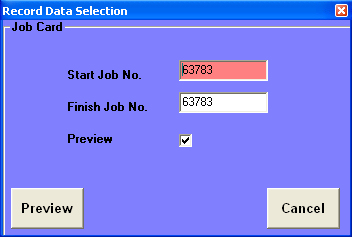
For the tutorial leave these fields as they are and select the Preview Button. After a short delay the job card will be displayed in the window. Select the print button to send it to the printer. This document can follow the job through its various manufacturing processes.
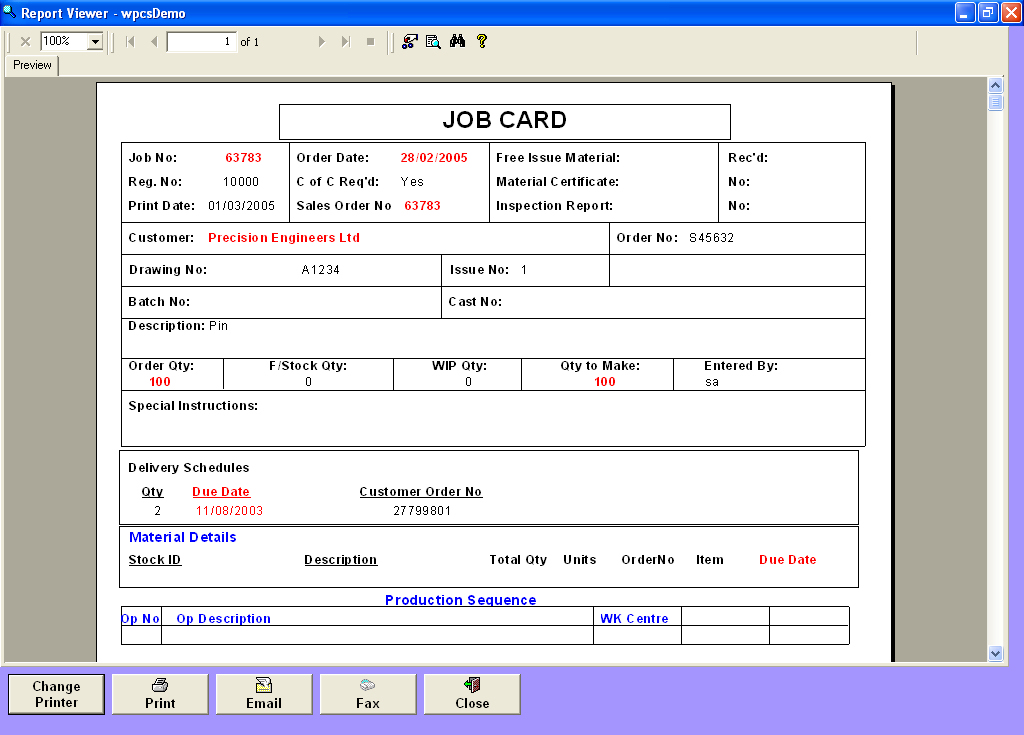
Any document or report from the Red Ant system can be tailor made to suite your company. Please see Document and Report Design section for more details.
Our next step will check the availability of material to enable us to produce the job. From the top menu select material allocation.
![]()
The RBM10 stock id we entered earlier is shown as material required in the top table and the lower table shows where the material has come from once it has been allocated to the job (see full trace).
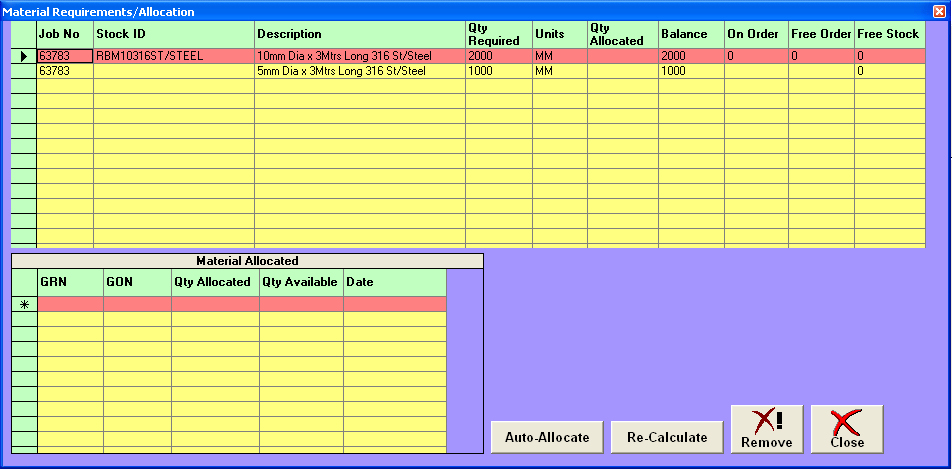
Field Explanations:
•Quantity required is the total of material necessary to complete the whole job
•Qty allocated is the total material reserved for the job
•Balance is the difference between quantity required and qty allocated
•On order is the total of this specific material that is on order from a supplier
•Free Order is the total material on order that is NOT reserved for other jobs
•Free Stock is the total material in stock that is NOT reserved for any other job.
As the job has no material available anywhere then a purchase order will need to be raised to cover this. See purchase order tutorial.