|
Assembly
|   |
|
Assembly
| |
To build and assembly of parts, each item will require a valid Stock ID. Generally the Stock ID is made up of a combination of the drawing/part no and an issue. The issue is very important when making to stock so as the parts can be located by their issues. The system can auto generate the Stock ID using a combination of preset values. See the System Defaults section on how to do this.
The Assembly button will only be visible when a register item has a valid stock id and the check box 'Assembly Item' has been checked as show in the example below. The Assmbly button will also be shown in the Quotes and Job Orders modules if the register item is an assembly.
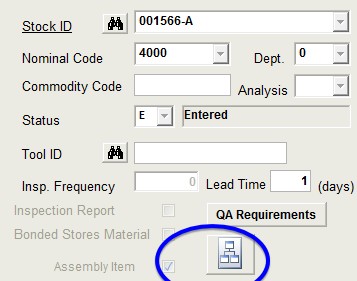
An assembly will be made up of a Top Level register item and several sub register parts. Both the top level and sub parts are created in the same way as a standard register item each with their own plans.
To build an assembly tree locate the top level register item so it is visible on the screen. Edit the record and select 'Assembly Item' making sure you have a valid stock ID first. Select save and the Assembly Tree button will be shown. You do not need to do this with any of the sub parts unless you want to create a sub-assembly for a lower level part.
Select the Assembly Tree button to open the tree view window. If this is the first time you have selected this for the part a message will appear stating that it will create a new assembly tree for you. The Tree window will look similar to the example below but with the top level item only.
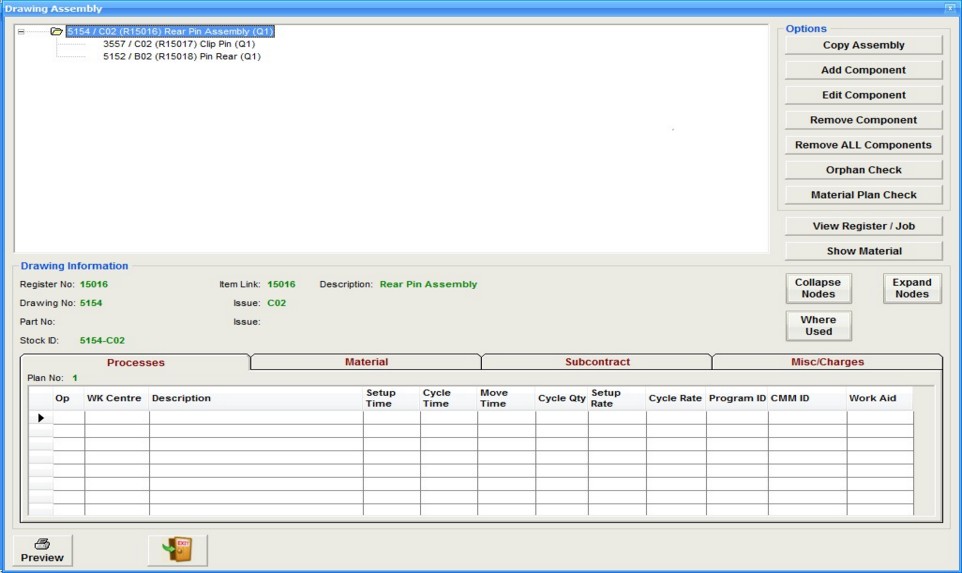
To add an item to the tree, select the level and item on the tree where you want to the new part and then select 'Add Component' from the menu on the right. If this is a new assembly then select the top level item as highlighted in the above example. The following window will appear. Enter the new item using any of the drop down fields. It is sometime easier to select the sub parts using their register no's as apposed to using the customer's drawing/part no's. Only registers with Stock ID's will be available for selection
Enter the Qty of the item that will be required to build 1 of its parent. e.g. if you need 4 sub parts to make 1 parent then enter 4. Select Save and the item will now be shown in the tree.
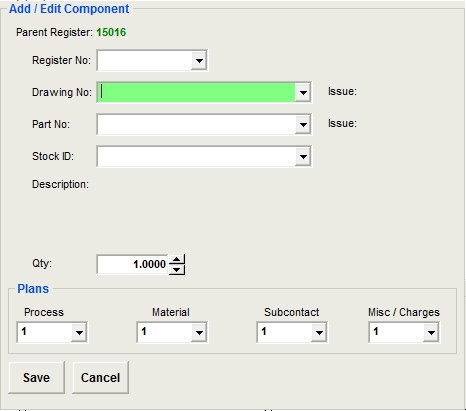
To add more components select the parent item in the tree before selecting 'Add Component'
Use the Edit / Remove Component menu buttons to make changes to the assembly structure. If you add a component which is also an assembly then all it's child nodes will be added to the current tree. Be aware that if you make any changes to the sub nodes of an exisitng assembly then that assembly will also be changed. If you use the Remove Component option for a node that has children then the children will also be removed.
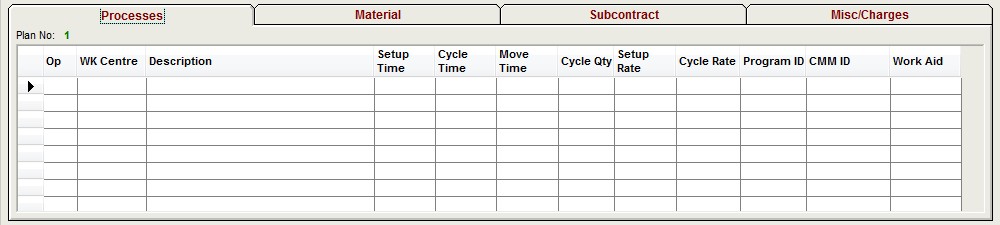
As items are added to the tree, material entries are made to their parent register and these are shown in a grey highlight to indicate this as shown in the example below
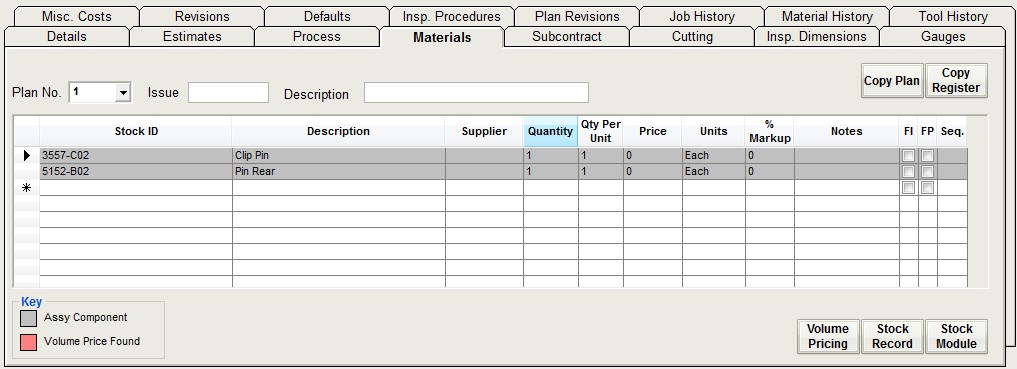
These entries cannot be changed or removed in the register material plan tab, only from the assembly tree itself.
Remove All Components
This option will remove ALL component items (nodes) from the tree. Use with caution.
Orphan Check
This feature checks all the node links to make sure they are all valid. Only use this option if you are getting any issues with the tree structure.
Material Plan Check
This will check all nodes that have child nodes to make sure they have a valid material plan.
View Register / Job
When this option is used the selected tree node will be displayed as either a register or job record depending where in the system the tree originated
Show Material
This will expand the whole tree and display any material plan items that are not assemblies. The Hide material button will do the reverse.
Expand Nodes
This will display all child nodes under a parent
Collapse Nodes
This will hide all child nodes under a parent
Where Used
This option will display a list other assemblies where the selected tree node is being used in other assemblies
Preview
This will output a preview report in detail or summary format for the visible tree. This can be modified to suite different customer requirements
Selecting a tree item you are able to view the plans using the tabs on the windows shown below. You are not however able to edit the plan items from within the assembly tree module.
Using the Estimate tab of the top level item in the register module will allow the user to get a costing of the complete assembly as shown in the example
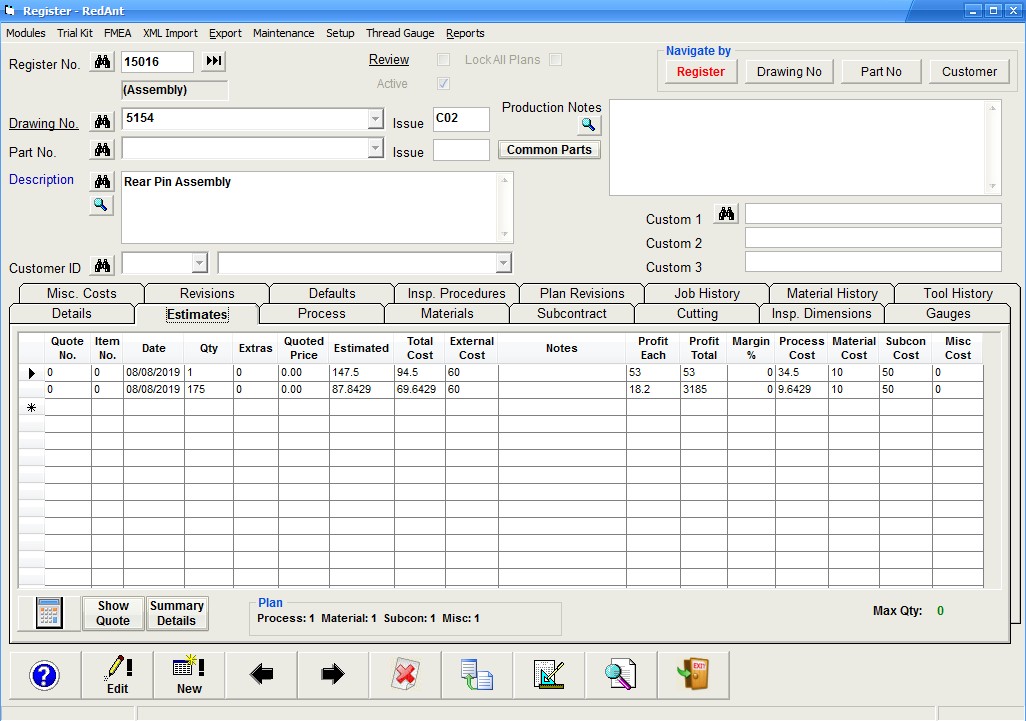
The cost of each assembly component is calculated using its own plan details and then rolled up to the top level. The same costing applies when using the estimate tab int the quotes module as well.
Quotes
Use the same principle to add an item to a quotation as for an assembly. Use the register no / drawing no of the top level to add the item to a quote. From here you can use the estimate tab to enter the quantities required and calculate the costs involved.
You can add each of the sub parts as quote items to verify their individual qty/costs. Un-checking the 'Print' option against a qty in the estimate tab will remove the item/qty from the final quote output to the customer. You can also use the register module estimate tab to do the same individual costings rather than add the items to the quote.
Job Orders
To create a works order for an assembly is no different than creating a normal job except the system will create a job for each sub level (node).
Select New and then select Yes to New Order. Enter the register no/drawing no. of the top level assembly item. Proceed to fill in all the necessary details uncluding order/job qty.
Select Save and the following options will be displayed to the user
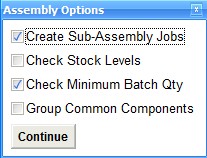
If at this point you do not require new jobs for all the coponents of the assembly then un-check the 'Create Sub-Assembly Jobs' and press continue. No further processing will take palce
Check Stock Levels - leave this un-checked until you are familiar with the whole assembly process. If checked, this will check stock levels of sub parts and if there is stock available it will allocate this stock to its parent node. If the full quantity is available from stock then a job will not be produced for the particular node and its children.
Check Minimum Batch Qty - if checked the system will validate whether the job qty is greater than or equal to the minimum qty for the node as dictated by its register minimum qty value. If the job quantity is less then the system will increse the job so that the minimum qty is being made.
Group Common Components - use this option with caution! The system will check if there are other similar jobs under the same works no. making the same component. If there are then the existing job qty will be increased by the current node's required quantity.
Selecting continue with the 'Create Sub-Assembly Jobs' checked will produce a job for the top level and a job for every component in the assembly. To verify this use the information log to check for any issues and then by selecting the 'View Order' tab it will show all the jobs created with links to their parent jobs and the levels.
It is advised to have your Job/Route card modified to show these links as it will make it easier for operators to see when jobs are part of an assembly rather than jobs to be delivered to a customer.
Each component job will have no order qty and will have a reference to the parent in the order no. field.
As each component job is manufactured, use the 'Complete Job' option to book the item to stock which will then in turn automatically allocate the quantity produced to its parent job. This can be verified by looking at the parent job and using the 'Material Status' option.
It is only the top level job (parent of all the components) that is delivered to the customer. It is imperative that all the component jobs are completed off individually.