|
Login ID
|   |
|
Login ID
| |
This module is used to grant a user access to the software and assign a their Security Group access level.
From the Main Menu select Maintenance / Users / Login ID
The following form will be displayed:
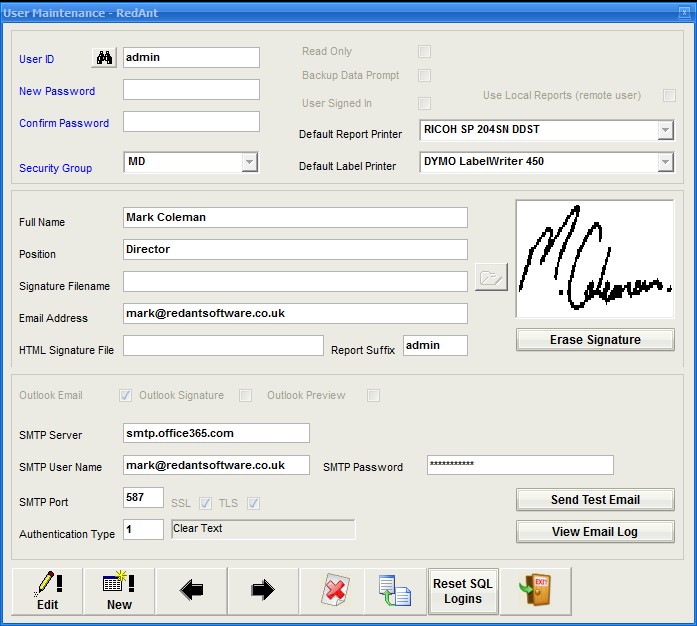
The Admin user cannot be removed from RedAnt as it is required to perform certain tasks within the system such as setting up new users etc. You can however change the password and any other details as shown.
To create a new user login account select the New button from the bottom menu. You will be presented with an empty form to fill in. When you have entered all the details select Save from the bottom menu. Selecting Cancel will discard any changes.
User ID
a name up to 10 characters in length that the user will use as their sign in name. This is NOT case sensitive
Password
Any alpha numeric combination which IS case sensitive and can be up to a maximum of 30 characters
Security Group
A valid Security Group
Read Only
When this option is selected the user will only be able to view information and print documents. What they can see will depend on their security group
Backup Prompt
Selecting this option will prompt the user to make a Redant backup of the data files. See this link for how to make a backup
Full Name
Users full name which can be printed on documents
Position
position held within the company
Signature Filename
This field can only be changed for existing saved records. Once you have saved the current details selecting Edit will allow changes to this field. Using the file locator button to the right of the field, the appropriate signature file can be selected and imported into RedAnt.
Supported files are BMP and JPG and must be less than 50k in size. To create a signature file, take a white piece of A4 paper and get all users to sign their names in Black ink. Using a scanner, scan each signature individually as a black and white image. It is viatal it is scanned and saved as a black and white image as a colour scan will cause the printed image to display with a coloured background. Save the file somewhere where it can be retrieved by RedAnt.
When the changes have been saved RedAnt will display the user's signature in the display window. There is a button 'Erase Signature' to allow removal if required.
Email Address
User's valid email address
Outlook Email
If you require Microsoft Outlook to send your emails directly then select this option. The SMTP server name,login name, password, port, tls/ssl and authentication can then be ignored.
Outlook Signature
Select this option will use your Outlook signature and append it to all emails sent
Outlook Preview
This option will allow you to preview the email in Outlook prior to sending.
SMTP Server Name
This is your outgoing email server address
SMTP Logon Name
This is the user name required to logon to your outgoing email server. Some SMTP server do not require this.
SMTP Password
This is your password for the SMTP server logon. If there is no logon name then there will be no password.
SMTP Port
Port used for sending emails. Most outgoing email uses port 25 but with the increase of Cloud based systems then this will be different.
SSL
Select this if the SMTP requires an SSL encrypted connection
TLS
Select this if the type of encrypted connection is TLS and SSL has been selected
Authentication Type
The most common authentication types are 1 = Clear Text and NTLM (network servers)
Fax Server
This is the name of your network Microsoft Fax Server or if you are using a local fax then leave it blank
Fax Cover Page
When sending faxes from RedAnt you can include a fax cover page. Use this option to select the appropriate file
Default Report Printer
To set the user's default report printer then you MUST make this selection from the user's workstation as the list of available printers will not be shown correctly
Default Label Printer
As Default Report Printer above
Reset SQL Server Logins
If a RedAnt backup has been restored onto a new SQL Server build due to hardware failure etc. then this option will rebuild all the user logins. You may see several messages / warnings but these can be ignored.
Copy Settings To All Users
This will copy all the SMTP and Fax settings to all users saving entry time.
Test Email
This will send a test email to the user being displayed. It is useful for testing the email settings.
View Email Log
Views the Users email log
Reset SQL Logins
Use this option with caution. If the system has been restored due to a hardware failure, user security details will not automatically be added to the database. This option will re-create a database login account for each user and reset their passwords to '1234'. Call support for more details before performing this option.