|
Purchase Orders
|   |
|
Purchase Orders
| |
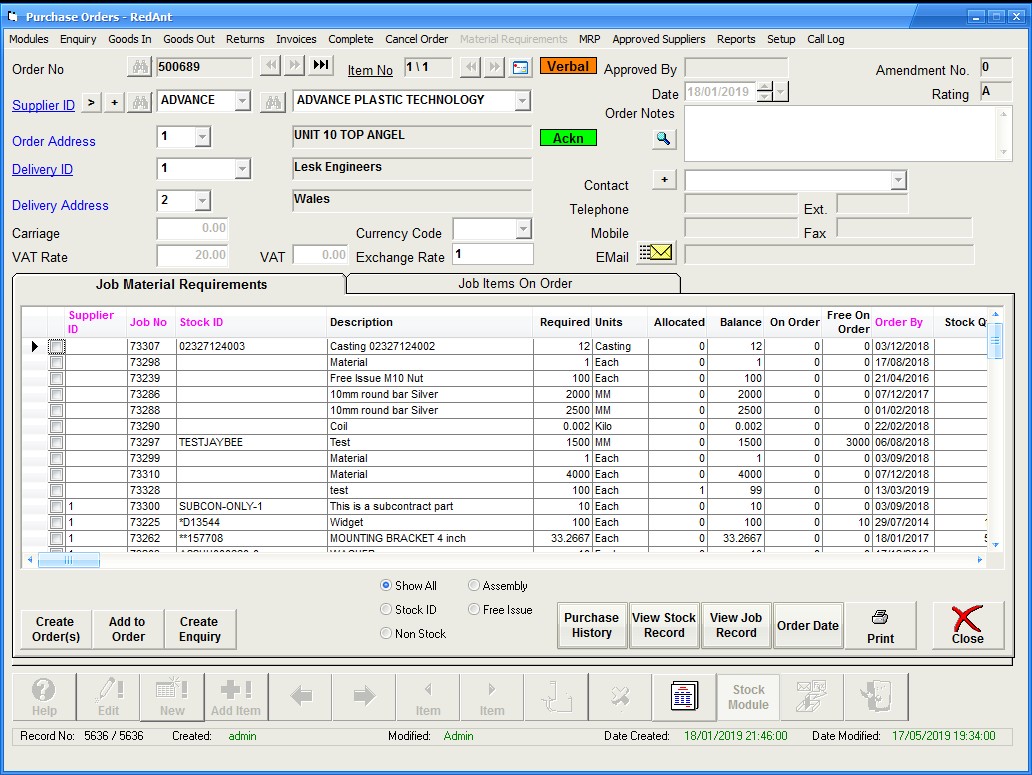
Select the Purchase Orders button from the Main Menu. On first loading the last Purchase Order entered is shown as the example screenshot below. The minimum input requirements are shown as blue field titles.

To create a new purchase order select New from the bottom menu options. There are several entry points where you may start entering details for the order.
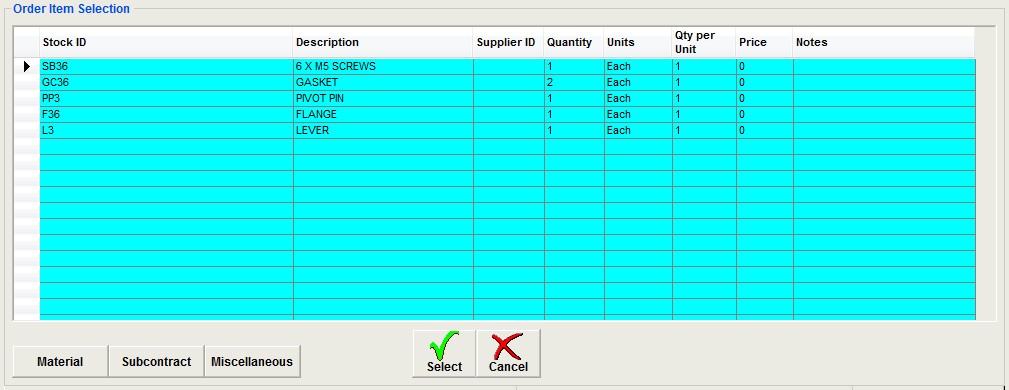
Using the Job / Works No. - if the item to be ordered is for a specific job or works order then use either of these fields to locate it. A window will appear similar to the screenshot below where you can use the Material, Subcontract or Miscellaneous button to select items to be ordered from their respective grids. Items will only be shown where they have previously been planned against a specific Drawing Register.
Use your mouse to select an item from the grid followed by the Select button. The item will now appear on the purchase order
Using the Stock ID - Enter the ID for the item you wish to order. The system will search as you type and once located, pressing the enter or tab key will write the details on to the purchase order. If there is no stock id which matches your requirement you may create a new id at this point. To do this type the full ID you want to use and then tab or enter to the description field. The system will recognise it is a new ID and prompt you to confirm your requirement. A new ID will be created for future use when saving your purchase order.
If you cannot find the item you require using the ID then click in the description field and use the button located on the left hand side. This will display the 'full text' search window. Type in a word that you want to search for and then select search. All stock record containing this work will be shown in the grid. You can use more than one word in your search and exclude others. Use the help button in the search window to show how this is achieved.
You are not required to setup a unique ID for every different item you order. Using a generic code and a description will allow easy selection and then the description can be changed where necessary. This way tracking and quality is much improved once it has been received.
Add a new Stock ID when entering an order
Enter the new id in to the stock id field. When you move to the next field the system will prompt to confirm you want to create the new ID. When you save the item a pipip window will appear where you can confirm the details and enter a stock group.
Using Description only - There are many disadvantage to this method as there is no way of tracking the movement of the item once it has been received. Also if a repeat order is required it will be necessary to enter all the details again.
If the 'Enforce Approval' is switched on then you will only be able to select suppliers that have been approved to supply the item being ordered. This will only apply to items that have a Stock ID. The Stock ID record will have been setup with a Scope/Approval code and unless the supplier has the same code and it has not expired then you will not be able to place the order with them.
While entering the order you can use the Approved Suppliers tab to see a list of suppliers that can be used. Click on any column in the grid for the required supplier and then press the 'Use Selection' button to copy the details to the new order.
Field Definitions
Order No
The unique system generated number for the order
Item No
The first part of the field is the item number and the second part is the total number of items on the order
Supplier ID
The system's ID for the supplier record
Order Address
The suppliers address no. There can be numerous addresses for each supplier.
Delivery ID
The supplier ID where the items will be delivered to. This in most cases will always be 1 which is the internal ID used to record your company details. However this can be changed so the order can be delivered to a different company and address
Delivery Address
The address no. of the delivery address
Carriage
Total cariage charge for the order if known
VAT Rate
The rate of tax to apply to the delivery charge.
VAT
The tax amount calculated from the delivery charge and tax rate. This will automatically be calculated but can be overidden
Currency Code
Leave this empty to output the order in GB Pounds or select the currency from the list
Exchange Rate
This will default to 1 for normal UK transaction but a current exchange rate will be required if ordering in a different currency
Date
The date the order was entered
Order Notes
Any information that applies to the whole order can be entered here. This can be printed on the order if required.
Contact
The contact to send the order to. If the correct contact is not available in the list then you may use the + button to the left to add a new one
Job No
The job no the item is required for. This is only used to select material, subcontract or miscellaneous items that have been pre-planned
Works No
The works no the item is required for. This works in the same way as for job no above.
Stock ID
The ID used to store static details about an item
Description
The description of the item being ordered
Quantity
Quantity to order
Price/Unit
Price of the item
VAT Rate
The VAT rate applied to the item
Item Value
The total of the quantity times the price which is automaticall calculated but can be changed. If you enter a total value here before entering a price the system will work out the price each for you
Units
Units of measure of the item being ordered
Required By
The date the item is required by. This will be printed on the order
Revised Date
If a change is made to the delivery date then it can be entered here leaving the required by to the original value. Next to this field is a + button which will show a complete history of changes made. Eitehr of these dates will update any related job or works order for scheduling and manufacture processes
Inspection Level
If the 'bonded stores' option is switched on then you will be required to enter an inspection level for the item. If the item used has a stock ID then this will already have been entered for you and cannot be changed without the necessary security clearance. The level descriptions can be setup under the Inspection module from the Main Menu
Item Status
This is initially set to 'Waiting Delivery' and will eventually change to 'Complete' once the total delivery quantity has been made. There is an interim status of 'Part Delivery'. It he item has be be marked complete where there is a shortfall, use the Complete option on the top menu
Requested By
The user's ID who requested the order to be raised
Item Notes
Any additional information for the item which can be printed on the order if required
Project ID
The project the item is required for. Select from the dropdown list. See Projects for further information
Cost Centre
The cost centre analysis code for the project
Nominal
Accounts analysis code for cost purposes. See Suppliers for code setup
Department No
The internal department. This is used for reporting and cost purposes. See Departments for further details
Email (button)
Send an email to the contact for this order.
QA Requirements (button)
See QA Requirements in Quotes for further details
Jobs/Works Grid
If the Job/Works option was used to create the purchase order item this grid will contain the details necessary to pre-allocate the quantity required by the job/works no when booked in using Goods In
Add Job/Wks (button)
Using this button allows the user to add Jobs or Works orders to the requirement grid so they are pre-allocated upon delivery.
Remove Item (button)
This will remove the selected item from the grid
View Job (button)
By selecting a job from the grid the view job button will display the job details
Documents (button)
Any number of documents can be attached to a purchase order and are made available to sned as part of the emailed order. See the documents section for further details on this feature which is available in most modules
Stock Module (button)
Shortcut to load the Stock Module
Send Order (button)
This will output the order to a preview window where the user has several choices from output to an excel spreadshhet, pdf file, print or send it as an email.
Complete
This will manually complete an item on an order. Normally when full delivery has been made the item will become complete as part of the process but there may be instances where there are shortages and then this option can be used.
Cancel Order
This option will cancel the complete order and remove any reference to the items ordered. Use with caution
Material Requirements
Entering works orders and subsequent jobs which have been planned with material requirements will generate a demand for purchases to be made. Using this option allows a user to see all requirements which may benefit from bulk buying if one or more jobs require the same materials in a similar time frame. Column headings marked in magenta can be used to sort the data in the particular order making it easier to group information together. The radio buttons allow filtering by certain criteria.
From the button option you can also select items and create purchase enquiries to suppliers.
Selecting items using the check box in the first column allows you to either create a 'New Order' or add them to an 'Existing Order' using the associated buttons.
MRP
This option will drill down in to all levels of purchase requirements on the system and present the operator with a comprehensive ordering list from which orders can be place.
Supplier Approvals (top menu)
This lookup facility will allow a user to enter a scope from the left grid and view all the approved suppliers for that scope in the right hand grid. Useful for anybody who is not familiar with current suppliers and wished to place a purchase order or enquiry
Setup - Preset Notes
When entering information into the order notes or item notes fields you have the option of adding information using the preset notes option to save on repetitive typing. To do this use the preset notes button on the left of each of the fields. Use the setup - Preset Notes to add these preset notes.
Call Log
See Call Log for further details